Wednesday, April 25, 2012

Sheer Tea Party Madness

I found this wonderful square tablecloth at an estate sale. It was in perfect condition, with it's original tag in place identifying it as a cotton organza: the sheerest I've ever seen and crisp as a dragonfly's wing. Too bad that the matching napkins to this set, imported from Switzerland and sold at Sears, are long gone.
The white cotton corner appliques of a sail boat on embroidered waves, the scalloped edge, and the whisper of blue green all suggested a light as air design. Please note, I've been unable to capture the lightness of the color but it is the merest breath of green. The fabric is also a bit challenging to work on - hence the title of this article.
I toyed with many ideas on how to treat the neckline, and finally settled on an edging of bamboo/silk blend yarn because it would mimic the texture of the existing scalloped edging and help support the neckline without getting too heavy. I top stitched the yarn in place first, stabilized just outside the yarn with a thin bead of Fray Check, clipped the curves, folded the fabric in, pressed and trimmed it close.

Of course, I tested my process first, you must always do that, but when working with re purposed fabrics, sometimes there's not much scrap to work on. Here's all I had to test stitch length, width and tension on!
I stitched over the pressed edge with a stitch that goes left, center, and right to secure the edge. Here you can see the resultant texture, which mimics the existing edging. You can also see the loop I left for the button hole. I thought I was being so clever.
Since this yarn is a bit fuzzy and that, I felt, would worsen over time, I decided to work a button hole stitch in silk over it by hand. I double threaded up a needle in silk thread, took two stitches that took 5 minutes to untangle and get smooth, and said... naaahhhh.
And I cut that bad boy off.
Sometimes I get so wrapped up in trying to figure out everything in advance, only to find that I should trust that I'll figure the best solution when I get there and charge ahead. The easiest, simplist and most elegant solution for this situation turned out to be a hand-tatted button loop.
A quick dive into my button stash turned up 4 possible choices of vintage buttons from my collection, I settled on a sweet glass pearl button made in Germany (far right in photo), and sewed it on securely with several strands of YLI silk thread.
A needle-tatted loop is easy to do once you get the motion down. After a couple securing stitches, take a small stitch, inserting and exiting the needle at the points you want the button loop to begin and end - but don't pull the needle through yet. Tat over the needle  (Here's a nice video) and when you pull the needle through a loop will form. At left, I am comparing the length of the tatting to the button to estimate the length needed.
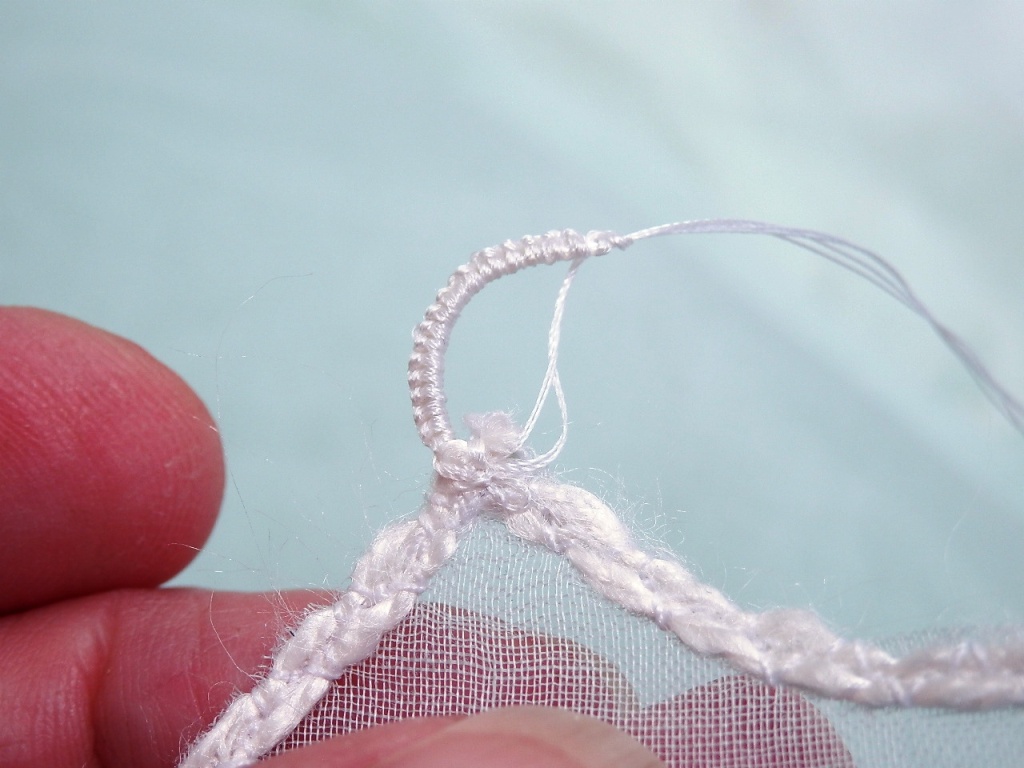
After pulling the needle through, you continue to tighten up the circle until you get to the size you need for the button. Be sure to try the button. You can easily spread out or compress the tatted stitches as needed. Once it is the right size, secure with a few stitches and a knot. I used multiple strands of YLI Silk for strength.
Here you can see the finished edging, button and button hole with the delicate finish I wanted.
Here is the Finished Top , shown with my beaded lace top underneath. You can click on any photo to enlarge.


Friday, April 20, 2012

Shaping Vintage Textiles


Constructing clothing from vintage linens is sewing in reverse. Instead of starting with a pattern and cutting whole cloth, here you drape with pieces and parts and try to make a cohesive whole. I try to honor the beauty of the original textiles and handmade laces that I use. But I also want my garments to have shape which means darts. Here is a way to work a bust dart into a print and maintain the pattern. You can also use a similar technique on laces.

I position the vintage laces and linen, a Stevens Linens Calendar Towel, so the print lies on the body the way I want.  


I can see the gape on the side where a dart needs to be.


I fold up the end of the dart and see that it will end in the bird nest, so I cut around that design element.  


Here you can see where it will be stitched down in a new location.


Here is the finished hand stitched dart.


Of course I had to do the same thing on the other side, this time cutting around a cherub's head.


I used a combination of invisible stitches, embroidery stitches, and even darning to blend the new dart into the design. Here you can see some darning in process, as I weave the needle back and forth to strengthen the fabric.


Both darts were worked completely by hand and the effect is just what I wanted: soft shaping on the front and no interruption in the pattern.
Adjustable snapping shoulder straps and side ties, and other fun features complete this summery blouse which you can see at left, (in photos taken before pressing, sorry) and the  Finished Blouse Here.

Thursday, March 22, 2012

Tribal Turkish Tubes


“You ought to be living in a yurt somewhere” I said aloud, and laughed, as I hung this piece out to dry. The undulating tribal Turkish tulip design fluttered in the wind: a lacy, felt-like banner in vivid red, aqua and yellow orange against the cerulean sky.

The finished piece, seen here, can be worn as a head or neck scarf, or about the waist and hips, or hung on the wall. I like it's old texture, rather like a washcloth worn lacy with age. Bold and delicate at the same time.

However it all started as a desire to finally find a good use for a knitting knobby. You know those little hand crank machines that produce a knitted tube, and seem like a good idea when you shell out 30 bucks at the craft store. I thought it was a good idea - twice. Yup - forgot I already owned one when I bought another. Later I discovered how very limited they are, in the yarn size and type it can accomodate, when I broke the "Embellish Knit" and still had the original "Magicord Machine", which the package states is "The Knitting Knobby of the '90s". All apparently waiting for me to rearrange my studio and come across some big spools of closeout thin yarns, get an idea, and start cranking out tube yardage.

After I knit out long ropes of red and aqua,  I chose to forego sketching and worked right in the yarn on a long piece of adhesive backed soluble stabilizer (AquaMesh Plus by OESD).  Starting in the middle of a long blue knitted rope, I worked with left and right hands simultaneously, keeping the design as symmetrical as possible and working quickly. I filled in the background with red rope, and added spots of yellow orange chenille yarn.
When all the colors were in place, I stitched over the whole thing like mad, joining and defining areas. I used a darker teal thread which lended an almost batik appearance to this strange, lacy, textural cloth. After the stabilizer was washed out, and the piece dried, I  reinforced areas and fixed unwanted holes with stitching and added beads to finish the long fringe ends.

The adhesive was harder to wash out than expected and it took a second, vigorous scrubbing. The piece has a nice feel to it. I may play with this method more, but may leave off the adhesive and baste stitch instead.


Wednesday, January 11, 2012

Thermo Printed Recycled Shipping Label

I’m always trying to make products and cohesive packaging from as much recycled materials as possible. Today, in the course of experimentation, I happened upon a bit of fun paper magic.
I wanted to create a sticker to hold a pleated tissue around my birds nest earrings, and grabbed, from my saved paper stash, a return label from an Amazon package. I chose it for its thinness because I wanted to paper-cut a heart rather like a snowflake. It folded and cut beautifully and after unfolding, I decided to flatten it with a warm iron. That’s when I discovered that it is thermo paper and it turned from white to black immediately. I really liked the way this looked and I lightly glued it into place.
I had to play some more! A brush with a warm iron created a lovely mottled effect on one side while remaining white on the other. I cut another heart shape and using a die-cut cardstock heart as a heat mask, applied the iron to it. I played until I ran out of scraps. I can’t wait to scrounge another label and play some more.

Saturday, December 3, 2011

Santa's Workshop Tip on Bias Linings

I've been a bad, bad blogger. Maybe Santa will still be good to me because I've been busy in the workshop.

And I know I'm not alone. So, fellow seamsters, here's a quick sewing tip for linings.

                     
When there is fabric on the bias it will stretch out as it hangs. And when you use two different fabrics, allthough the pieces are cut exactly the same size, they will hang-out differently. Case in point, is my  Little Red Riding Hood Cape .

When constructing this garment, I finish the shoulder seams and attach the hood and then let the garment hang on the dress form for several days. The black satin lining will stretch as much as 3/4 " in places. I pin it all around to determine the variance and remove the excess. If you do not remove this excess fabric your garment will be balloony and not ever hang properly. The tendency of fabric on the bias to stretch is a good thing to remember and I hope you find this helpful on your next drapey, bias project.


Sunday, November 20, 2011

Thanks Sale

Just a little way of saying THANKS for a wonderful year due to the support of all my family, friends, and fans......

!!! THANKS SALE !!!  Black Friday - Cyber Monday, 11/25/2011 - 11/28/2011, Midnight to Midnight PST,  everything in Jeanine Designs
 is on SALE 20% - 30% off

Enter coupon code "THANKS20" at checkout to receive a 20% discount.

Returning Customers and those purchasing 2 or more items may instead use the coupon code "THANKSAGAIN30" at checkout to receive a 30% discount.

*Note - I'll be updating stock on hand daily but be aware that some items are one-of-a-kind. If an item you wanted has been sold, just convo me and we'll talk about making the item for you, options, and delivery times. This can't be combined with other offers, sorry.

Monday, October 10, 2011

Perfectly Peacock

I'm posting these photos in their current orientations because all my attempts to right them have failed. Some miscommunication between editing programs is beyond me to sort at this hour. And besides - this whole project came about because of a mistake, so it seems appropriate. Sometimes you must say Why The Fury?
You see, I'd run into Sew Vac with a whirl of questions (those folks are so great!) and meant to get water soluble stabilizer in two sizes. Instead one of the rolls I picked up was *sticky* soluble stabilizer. I didn't catch the mistake until after the cellophane was torn off. I thought of asking if they had a shrink wrap so I might return it, since it is pricy stuff, but it was my mistake and I thought 'I might use it one day'... And the very next day my curiousity got the best of me and I started this Peacock Scarf.
After lately doing a lot of machine programming and very literal designs, the idea of working a lace collage of sheers and yarns very organically and loosely was appealing. It has been a while since I let loose with some free-motion embroidery. And to think that I once did so much of it I had carpal tunnel ankles from having the pedal to the floor!
So I approached this like a painting. I drew a loose cartoon, influenced by peacock feathers, but tried to keep it very free. I decided to repeat certain elements in a scarf-like shape, but to not render it literately. I worked very fast, not judging, intuitively. I learned that in a workshop. Thanks Lance!

I stitched all over this initial collage layer of sheers and yarn with black silk thread in the needle and bobbin to keep the 'hand' of the piece as soft as possible. Then I added more dabs of yarn, and more stitching. And then, since I wanted the piece to be double sided, I turned it over and added more yarn and stitching. You might think the sticky side down would be a problem, but the embroidery covered so much of the surface that it slid quite well - the sticky areas serving as a convenient hand hold to help steer the fabric.

After I washed away the stabilizer and could see how the piece moved, some individual pieces were added by detached embroidery. They add movement and dangle, and provide a means of tying the piece in a variety of fashions.

I must say, the piece took on a life of itself. It is sheer and soft - yet crisp and commanding. It weighs nothing and yet can appear almost bulky, powerful. It iridizes in the changing light and can morph into many shapes. Its boldness makes me think of a Priestess who has channeled the Peacock and is fiercely, proudly parading. I think it came out Perfect - by accident.  See the finished piece here