 I found this wonderful square tablecloth at an estate sale. It was in perfect condition, with it's original tag in place identifying it as a cotton organza: the sheerest I've ever seen and crisp as a dragonfly's wing. Too bad that the matching napkins to this set, imported from Switzerland and sold at Sears, are long gone.
  The white cotton corner appliques of a sail boat on embroidered waves, the scalloped edge, and the whisper of blue green all suggested a light as air design. Please note, I've been unable to capture the lightness of the color but it is the merest breath of green. The fabric is also a bit challenging to work on - hence the title of this article.
 I toyed with many ideas on how to treat the neckline, and finally settled on an edging of bamboo/silk blend yarn because it would mimic the texture of the existing scalloped edging and help support the neckline without getting too heavy. I top stitched the yarn in place first, stabilized just outside the yarn with a thin bead of Fray Check, clipped the curves, folded the fabric in, pressed and trimmed it close.
 Of course, I tested my process first, you must always do that, but when working with re purposed fabrics, sometimes there's not much scrap to work on. Here's all I had to test stitch length, width and tension on!
 I stitched over the pressed edge with a stitch that goes left, center, and right to secure the edge. Here you can see the resultant texture, which mimics the existing edging. You can also see the loop I left for the button hole. I thought I was being so clever.
 Since this yarn is a bit fuzzy and that, I felt, would worsen over time, I decided to work a button hole stitch in silk over it by hand. I double threaded up a needle in silk thread, took two stitches that took 5 minutes to untangle and get smooth, and said... naaahhhh.
 And I cut that bad boy off.
 Sometimes I get so wrapped up in trying to figure out everything in advance, only to find that I should trust that I'll figure the best solution when I get there and charge ahead. The easiest, simplist and most elegant solution for this situation turned out to be a hand-tatted button loop.
 A quick dive into my button stash turned up 4 possible choices of vintage buttons from my collection, I settled on a sweet glass pearl button made in Germany (far right in photo), and sewed it on securely with several strands of YLI silk thread.
 A needle-tatted loop is easy to do once you get the motion down. After a couple securing stitches, take a small stitch, inserting and exiting the needle at the points you want the button loop to begin and end - but don't pull the needle through yet. Tat over the needle (Here's a nice video) and when you pull the needle through a loop will form. At left, I am comparing the length of the tatting to the button to estimate the length needed.
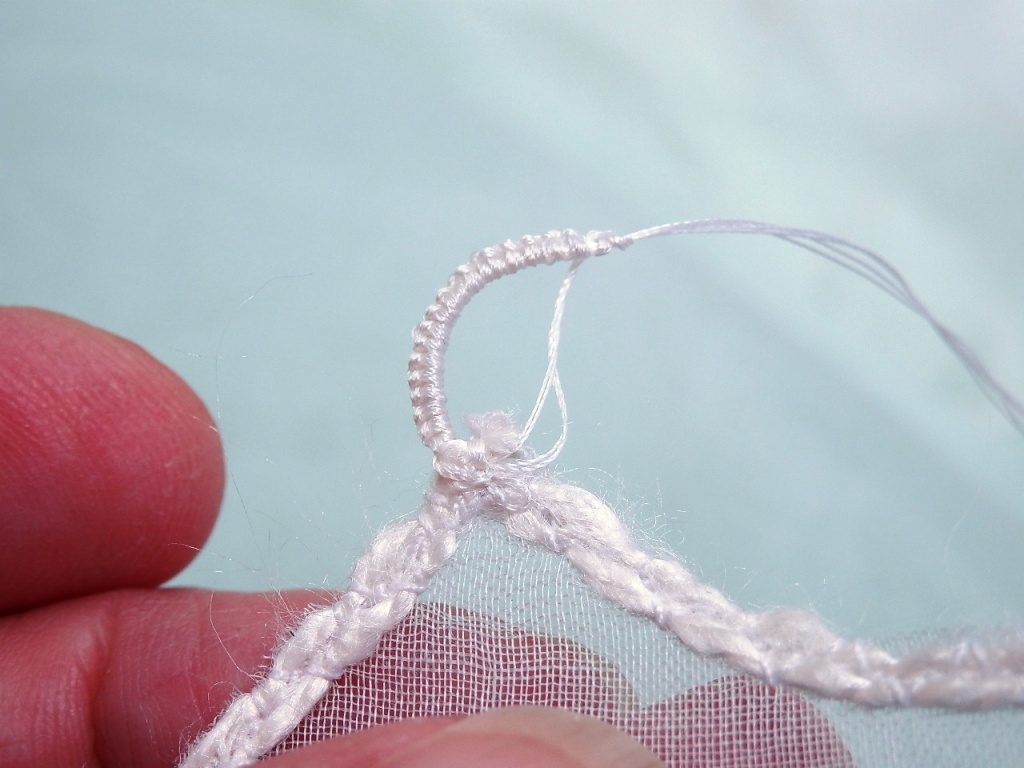 After pulling the needle through, you continue to tighten up the circle until you get to the size you need for the button. Be sure to try the button. You can easily spread out or compress the tatted stitches as needed. Once it is the right size, secure with a few stitches and a knot. I used multiple strands of YLI Silk for strength.
 Here you can see the finished edging, button and button hole with the delicate finish I wanted.
 Here is the Finished Top , shown with my beaded lace top underneath. You can click on any photo to enlarge.


